Hướng dẫn tạo form đăng kí bằng php cho người mới bắt đầu
Khi xây dựng một trang web động như các trang thương mại điện tử hay các shop bán hàng, chức năng đăng ký và đăng nhập là không thể thiếu. Trong bài viết này, tôi sẽ hướng dẫn bạn cách tạo một Form đăng ký sử dụng PHP và MySQL để tạo thành viên một cách đơn giản.
Để hoạt động tốt trước tiên bạn cần phải cài đặt XAMPP khởi động lên test thử xem PHP đã chạy chưa nhé!
Tiếp theo, trong thư mục htdocs của bạn, hãy tạo một thư mục mới và đặt tên là "dangky". Trong thư mục này, bạn cần tạo ba tệp tin: "register.php" để nhập thông tin, "xuly.php" để kết nối với cơ sở dữ liệu và "style.css" để thiết lập kiểu cho trang web.
Bước 1: Tạo cơ sở dữ liệu để lưu trữ thông tin
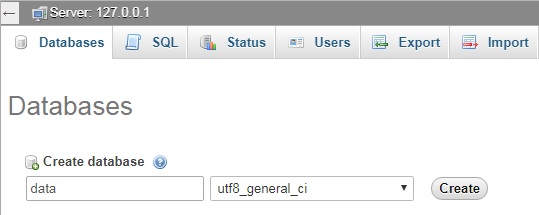
Để bắt đầu, hãy truy cập vào trang quản lý cơ sở dữ liệu của bạn bằng cách dán đường dẫn "http://localhost/phpmyadmin/" lên trình duyệt. Sau đó, hãy tạo một cơ sở dữ liệu mới với tên là "data" và lựa chọn bảng mã hóa là "utf8_general_ci", sau đó nhấp vào nút "Create".
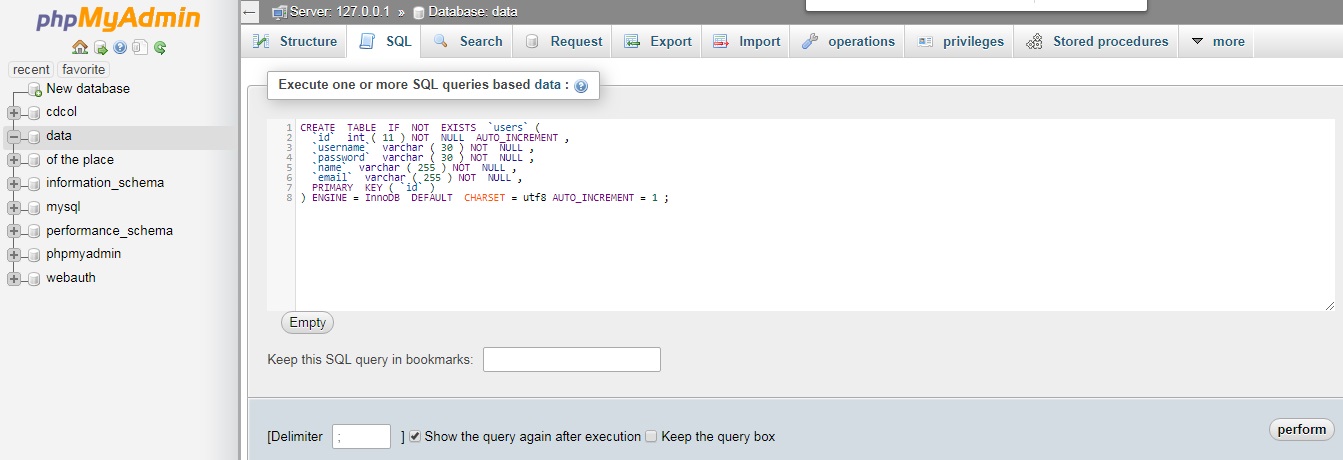
Xong bạn nhấp data chọn tab SQL dán code sau vào
CREATE TABLE IF NOT EXISTS `member` (
`id` int(11) NOT NULL AUTO_INCREMENT,
`username` varchar(15) NOT NULL,
`password` varchar(50) NOT NULL,
`phone` varchar(15) NOT NULL,
`email` varchar(100) NOT NULL,
PRIMARY KEY (`id`)
) ENGINE=InnoDB DEFAULT CHARSET=utf8 COLLATE=utf8_general_ci AUTO_INCREMENT=1 ;
Bước 2: Copy đoạn code sau cho vào register.php
<!DOCTYPE html>
<html>
<head>
<meta http-equiv="Content-Type" content="text/html; charset=UTF-8">
<link rel="stylesheet" href="style.css"/>
</head>
<body>

<form method="post" action="register.php" class="form">

<h2>Đăng ký thành viên</h2>

Username: <input type="text" name="username" value="" required>

Password: <input type="text" name="password" value="" required/>

Email: <input type="email" name="email" value="" required/>

Phone: <input type="text" name="phone" value="" required/>

<input type="submit" name="dangky" value="Đăng Ký"/>
<?php require 'xuly.php';?>
</form>

</body>
</html>
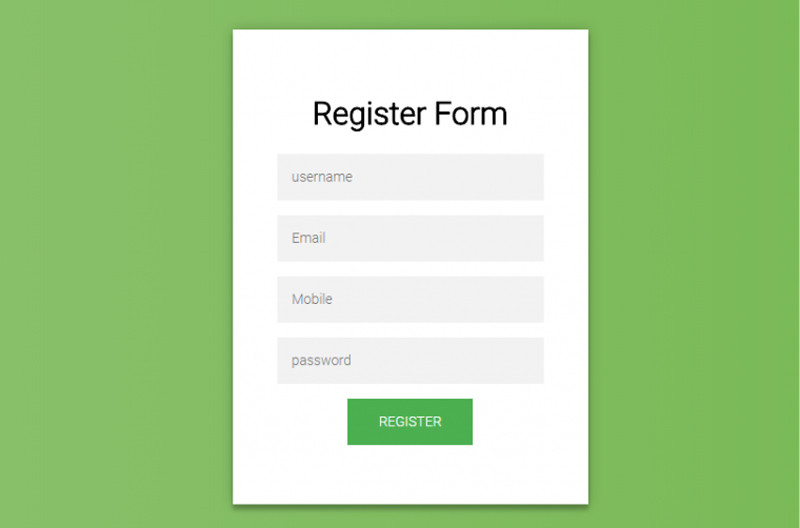
Tạo Form đăng ký với các trường:
- User: Tên đăng nhập
- Password: Mật khẩu
- Phone
Bước 3: Tiếp theo tạo file xuly.php kết nối tới Database để ghi dữ liệu thành viên
<?php
header('Content-Type: text/html; charset=utf-8');
// Kết nối cơ sở dữ liệu
$conn = mysqli_connect('localhost', 'root', '', 'data') or die ('Lỗi kết nối'); mysqli_set_charset($conn, "utf8");

// Dùng isset để kiểm tra Form
if(isset($_POST['dangky'])){
$username = trim($_POST['username']);
$password = trim($_POST['password']);
$email = trim($_POST['email']);
$phone = trim($_POST['phone']);


if (empty($username)) {
array_push($errors, "Username is required");
}
if (empty($email)) {
array_push($errors, "Email is required");
}
if (empty($phone)) {
array_push($errors, "Password is required");
}
if (empty($password)) {
array_push($errors, "Two password do not match");
}

// Kiểm tra username hoặc email có bị trùng hay không
$sql = "SELECT * FROM member WHERE username = '$username' OR email = '$email'";

// Thực thi câu truy vấn
$result = mysqli_query($conn, $sql);

// Nếu kết quả trả về lớn hơn 1 thì nghĩa là username hoặc email đã tồn tại trong CSDL
if (mysqli_num_rows($result) > 0)
{
echo '<script language="javascript">alert("Bị trùng tên hoặc chưa nhập tên!"); window.location="register.php";</script>';

// Dừng chương trình
die ();
}
else {
$sql = "INSERT INTO member (username, password, email, phone) VALUES ('$username','$password','$email','$phone')";
echo '<script language="javascript">alert("Đăng ký thành công!"); window.location="register.php";</script>';

if (mysqli_query($conn, $sql)){
echo "Tên đăng nhập: ".$_POST['username']."<br/>";
echo "Mật khẩu: " .$_POST['password']."<br/>";
echo "Email đăng nhập: ".$_POST['email']."<br/>";
echo "Số điện thoại: ".$_POST['phone']."<br/>";
}
else {
echo '<script language="javascript">alert("Có lỗi trong quá trình xử lý"); window.location="register.php";</script>';
}
}
}
?>
Ở đoạn
$conn = mysqli_connect(‘localhost’, ‘root’, ”, ‘data‘) or die (‘Lỗi kết nối’);
mysqli_set_charset($conn, “utf8”);
Thì data chính là Database bạn tạo trên http://localhost/phpmyadmin
Bước 4: Thêm CSS với file style.css để trang trí Form đẹp hơn
.form {
 width: 300px;
 border: 1px solid green;
 padding: 20px;
 margin: 0 auto;
 font-weight: 700px;
}
.form input {
 width: 100%;
 padding: 10px 0;
}
Cuối cùng bạn lưu lại các file và truy cập vào đường dẫn
localhost/dangky/register.php
Để test xem có được chưa nhé!


Nhận xét
Đăng nhận xét